DIY: How to Make Cute Patterned Thumbtacks and Revamp an Old Cork Board
Hi everyone! I’m Avery and I’m the newest contributor here at Game on Mom. As a Canadian blogger, I’m very excited to share some fun projects and Canadian findings with all of you.
When it comes to DIY projects, I generally cannot do-it-myself. I am a clumsy person and whenever I attempt something crafty, there’s always paint where it shouldn’t be, a step has been missed, and hot glue is suddenly in the carpet (even when there’s newspaper down … it always ends up on the edge. I am baffled and perhaps cursed). BUT, when Melanie invited me to join Game on Mom, I endeavoured to finally sit down and do something.
AND I DID. And if I can do it, you most certainly can too. So, here’s the project:
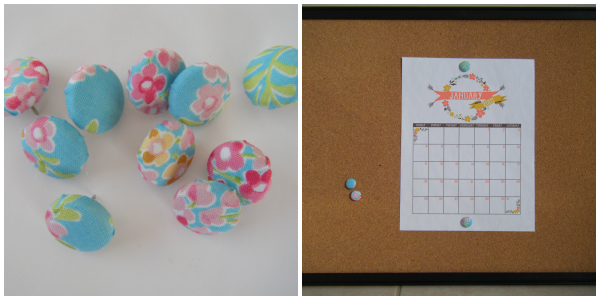
DIY cute patterned thumbtacks and revamp an old cork board
What you’ll need:
- Old cork board (I had one from years ago that was not very pretty – the frame was unstained wood, so it was ready for painting.)
- Thumbtacks (The ones with the flat top.)
- Patterned fabric (Fabric scraps would be perfect for this since much isn’t needed for each thumbtack and having different patterns would result in a fun, eclectic look. I bought a piece that was 46x53cm [18x21in] and it was more than enough. You’ll also want to opt for smaller prints, which will display better on the finished thumbtack.)
- Buttons-to-cover kit (You can find this at a fabric store. I used size 24, 16mm. The kit comes with a plastic holder and pusher – the one I bought had 4 buttons, so I also bought a refill box in order to make more thumbtacks.)
- Hot glue gun
- Wire cutters/pliers
- Paint (I used Martha Stewart’s Multi-Surface Satin Acrylic Craft Paint. It went on smoothly, dried quickly, and the finish was acceptably sateen … I didn’t need to use a sealer.)
- Foam brush
Time for to complete: About an hour.
For the thumbtacks:
- Starting with the buttons-to-cover kit, remove the loops from the backs of the buttons using the wire cutters or pliers. I believe you can find buttons without the loops (which would have spared my fingers as I was having much difficulty with the pliers). I was stuck with the loops and after painfully pulling 5 with the pliers, I found a pair of wire cutters to just cut the loops and had a much easier time removing the rest.
- Follow instructions on the kit to cover the buttons. My kit came with a pattern on the back in order to trace the correct amount of fabric for the button. I traced different areas of the fabric in order to get more unique buttons since I didn’t want every thumbtack to be the same.
- Once covered, apply hot glue to the back of the button and adhere thumbtack.
- Now you have a patterned thumbtack! Hooray!
- Repeat times however-many-thumbtacks-you-want.
For the cork board (there’s really not much to this section):
- Wipe wood to remove any dust and debris. Depending on the quality of your wood frame, you may need to sand and apply primer before painting. My frame happened to be sanded and unstained, so I got away without using primer.
- Paint. Since I used satin acrylic craft paint, I found that I didn’t need sealer once it dried because the finish was acceptable. The instructions on the paint recommended waiting an hour between coats, but it dried within a few minutes for me so I applied the second coat not long after the first. It worked out. Another tidbit: I slid paper between the board and the frame to prevent bleeding. Tape might have been more effective, but my laziness prevailed and it did the trick. (Sidebar: Originally, I wanted to wrap the cork in a pattern to add colour, but I wasn’t able to attempt this because it was firmly attached to the frame. If possible for you, a nice addendum to this project would be to wrap fabric around the cork, staple in the back, and re-attach to the frame.)
- You’re done! Go tack something!











-15 Comments-
That is super cute! I need to do this for a cork board in our kitchen. I looked for new thumbtacks and found some that I liked for $12, but this would be much less expensive and even cuter!
This nice real pretty like to try this
This is really adorable. Once you buy the buttons-to-cover kit, can you reuse it or do you need another refill pack?
Dede recently posted..Kinivo Bluetooth Hands-Free car kit #giveaway
Hi Dede! You can reuse the kit (which is really just the holder and pusher), but if you want to make more thumbtacks, you’ll need to get another refill pack (at the sewing store I went to, they only had refill packs of 5 but I’m sure you could find more).
Love these! They look so easy to make too. Gonna try this with my niece.
These remind me of my grandmother, I would just love to make some with her button kit. Thanks for sharing!
What a great idea! This makes it easy to match any room’s decor, and also easier to find if you drop one!
valmg @ Mom Knows It All recently posted..Enjoy A Perfect Day at Lake Placid, Adirondacks NY #PerfectDayADK
Now this is a cute way to decorate! I think I might have to try this.
Stefani Tolson recently posted..How To Make Owl Cupcakes
What a great idea!
I have been wanting to do something like this for awhile now and didnt think of the fabric tacks yet LOVE it….definitely gettting me a glue gun!
this is a great idea, thanks
I don’t use thumbtacks often, but these are really cute.
Cheryl recently posted..“The worst days of those who enjoy what they do, are better than the best days of those who don’t.”
OhEmmmGee. This is freaking CUTE! I love it so much. I will definitely be trying this.
My wife wants to make this for the kitchen. It is easy and inexpensive. She loves the patterened thunbtacks.
This DIY project looks very fun. Thanks for sharing!